How to Create a WordPress Blog: Everything Beginners Need to Know
This is a comprehensive guide to creating a profitable WordPress blog.
In this guide, you'll learn everything you need to know to set up a WordPress blog within 30 minutes. No technical knowledge required.
What we're going to discuss:
- Setting Up Hosting and Installing WordPress
- Choosing a theme
- Creating a Blog Page
- Publishing a Blog Post
- WordPress plugins
- Making Money with Your Blog
If you want to start a WordPress blog the right way, this is the only guide you'll need.
Step 1: Setup & Web Hosting
Every blog needs a platform, web hosting, and a domain name.
You want to set up your blog platform, web hosting, and domain name correctly from the very beginning. It's quite frustrating to have to change any of these later on.
After this chapter, you'll have all three perfectly organized.
WordPress
The biggest mistake people make when setting up a blog is choosing the wrong platform. Although there are countless ways to get a blog up and running on the world wide web, WordPress.org is the best option in 99% of cases.
Why is this the case?
WordPress.org offers several significant advantages over the alternatives:
- It is free
- It offers nearly complete freedom over your blog's design
- You can easily enhance your blog with plugins
- You can make money without restrictions (which many website builders like Wix have)
Additionally, more than one-third of all websites run on WordPress. This means it has a massive support community. Countless WordPress developers worldwide enhance the platform with plugins and other innovations.
You might be wondering, if WordPress is so great, why is it free?
WordPress is free because you need to arrange your own web hosting and domain name.
A domain name is a website's web address. For example, start24.nl.
Web hosting is where your site's files are stored. It's where your website lives on the internet.
There are countless web hosting services available. And choosing one can feel overwhelming. How on earth do you select the best hosting from such a massive range of options? Let me help you by recommending the hosting we use ourselves for WebsiteGecko: Cloud86.
Here's why I believe Cloud86 is also the best hosting choice for your blog:
- Cloud86 offers the fastest hosting in the Europe. Their WordPress hosting is 100% optimized for WordPress websites, meaning they run extremely fast on their platform.
- Cloud86 offers exceptional customer service. Their team responds to you in just a few minutes via phone or email. You don't have to wait for hours or even days like with many other services.
- They are suitable for both small and very large websites.
- It is easy to use and beginner-friendly.
- Cloud86 has received virtually perfect ratings from its users (4.9/5 on Google reviews).
Want to compare Cloud86 with other hosting options first? Check out our overview of best web hosting services.
Web Hosting and Domain Registration
I'm going to show you exactly how to set up hosting for your WordPress blog.
First of all, click here to go to Cloud86. Now choose one of their hosting plans:
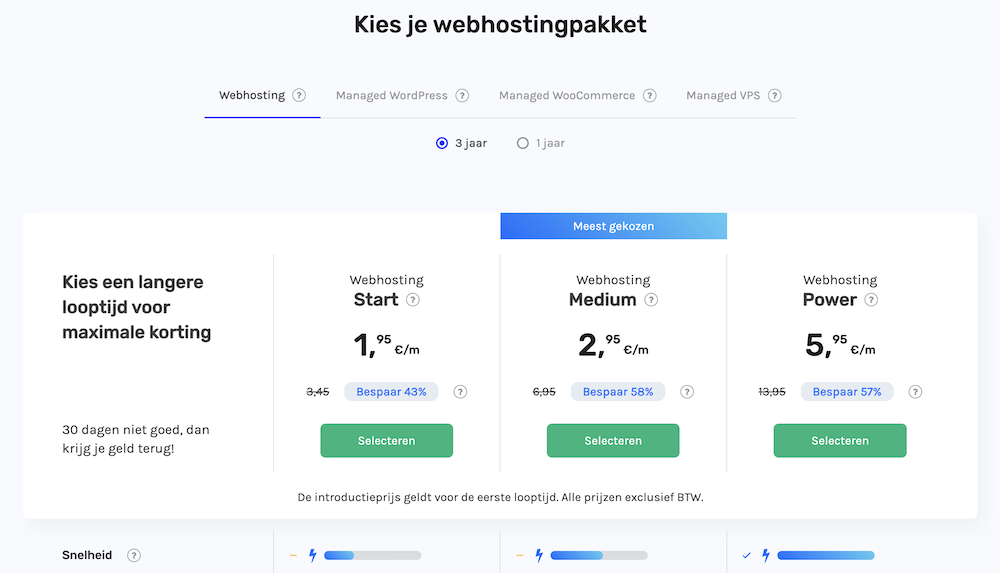
I recommend taking the Medium Web Hosting plan.
You don't need to worry too much about this choice. If necessary, you can upgrade or downgrade your plan at any time.
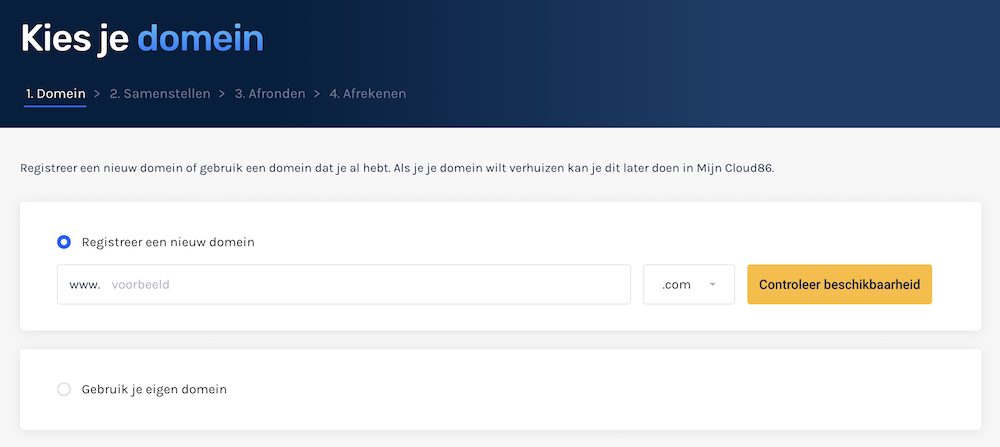
Now you choose a domain name.
Finally, enter your personal and payment details to complete your purchase.
Congratulations, you are now the proud owner of a piece of internet real estate. 🙂
Step 2: Install WordPress
With Cloud86, you can install WordPress in just a few clicks.
You'll also want your blog to run on a secure connection through an SSL certificate. This ensures that hackers cannot steal your visitors' data.
In this chapter, I'll show you how to do this.
WordPress Installation
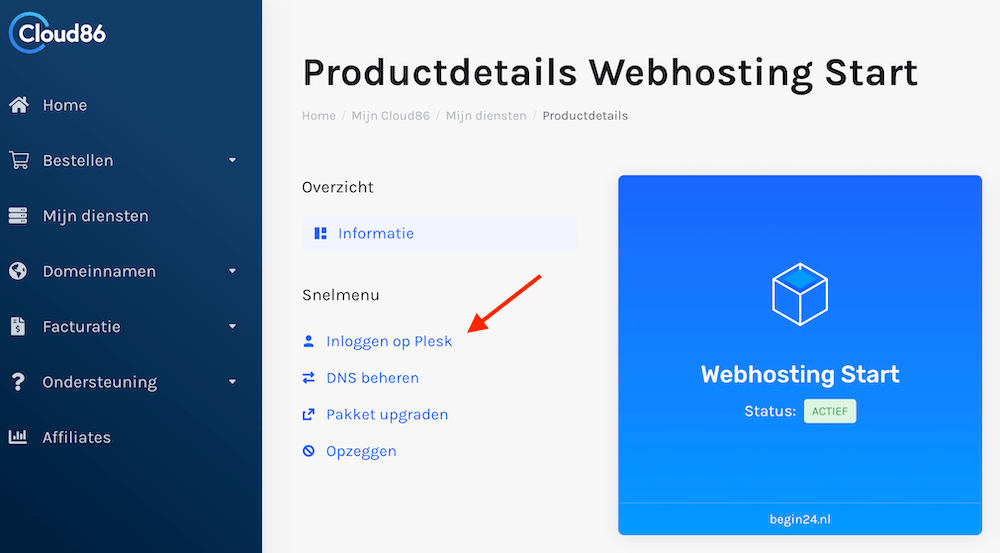
To install WordPress, click on Login to Plesk within the Cloud86 dashboard.
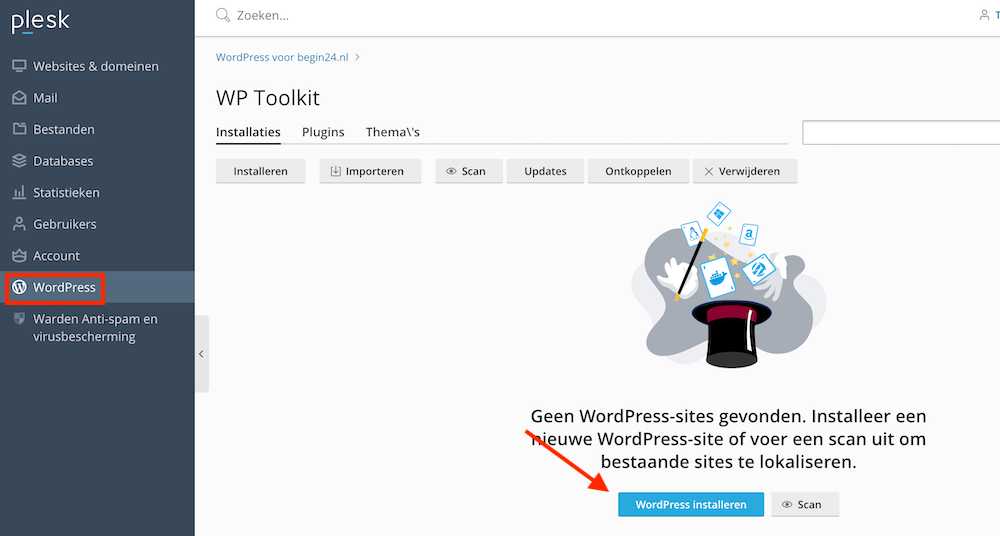
Then click on WordPress and then on Install WordPress.
Installing SSL on Your WordPress Blog
Before we get started with WordPress, we'll first install an SSL certificate on your site to ensure a secure connection.
This secure connection ensures that third parties cannot steal sensitive personal information from your visitors.
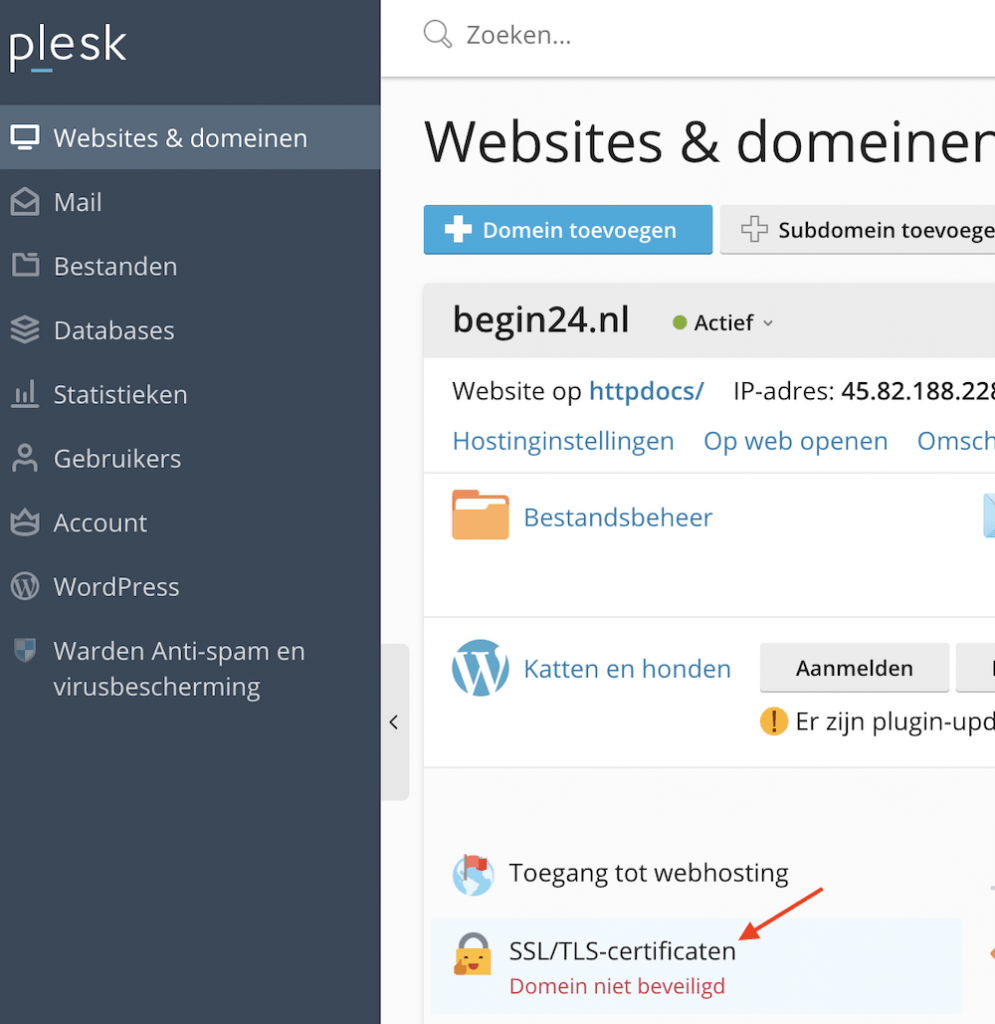
You can easily request an SSL certificate from Cloud86 directly through the Plesk dashboard:
Step 3: Choose a WordPress theme
The appearance of WordPress websites is determined by themes. You can have a WordPress theme installed on your blog within just a few minutes.
In this chapter, I'll show you how to install a theme. I'll also explain what you should consider when choosing a theme.
Customize the appearance of your blog
Themes determine how your WordPress blog looks. WordPress comes with a default theme, but your visitors won't be impressed by it.
Tinkering with your blog design is one of the most enjoyable aspects of running a blog. With the right WordPress theme, you can customize the appearance of your site to an amazing degree. Color schemes, fonts, spacing between various elements of your web pages, shadow effects, and small subtle details like rounded corners on your images can all be applied in no time at all.
There are thousands of WordPress themes you can install on your site. Some are free, while others require payment (these are known as premium themes).
You can change your theme by going to your WordPress dashboard and clicking on Appearance » Themes.

Then click on the Add New button.
On the next screen, you can browse through thousands of free WordPress themes. You can sort these by popularity, newest releases, and industry.

When you hover your mouse cursor over a theme, a Preview button will appear. Click on this to see how the theme will look on your website.

One of the nice things about WordPress is that you can change your theme without having to re-upload all your content to your site. So don't stress too much about the choice you're making right now.
The foundation of good web design is simplicity. I recommend choosing a theme that looks clean and organized, without too many frills. Also consider the users you want to attract: business visitors will expect a different looking website than yoga enthusiasts.
Once you've found a theme that appeals to you, hover over it with your mouse cursor and click Install. Your theme will be installed within a minute. The Install button will now be replaced by an Activate button. Press this to activate the theme.

Once your theme is installed, you can customize it by clicking on “Customize” under the Appearance menu.
You might be wondering which theme we use at WebsiteGecko. It's Kadence. Kadence is a beautifully designed theme that's highly rated by WordPress users. Kadence falls into the premium theme category, but it also offers a free version.
Once you've chosen your theme, you can publish your first blog post.
Step 4: Create a WordPress blog and publish your first blog post
WordPress has the best Content Management System available. It makes publishing content incredibly easy.
In this chapter, I'll show you how to publish your first article on your blog.
Write a WordPress Article
To write a blog post, click on Posts » Add New in your WordPress dashboard menu.
You are now welcomed by the Gutenberg editor.
The Gutenberg editor works with blocks (such as headings, paragraphs, and images). This makes it easy to add beautiful formatting to your articles.

Publishing a WordPress blog
In the right-side menu, you can add categories, tags, and a featured image to your blog post.
Categories refer to a broad grouping for your articles. Think of them as the general topics you want to discuss in your blog. Categories are hierarchical, which means you can create subcategories.
Tags describe specific details of your articles. Think of them as the index words at the back of a book. Tags are not hierarchical.
Tags don't appear in your articles. They primarily help make your articles easier to find through your blog's search function. Categories, on the other hand, are visible to your blog readers (although you can hide them if you want).
Under Featured Image, you can upload an image that appears at the top of your article and as a thumbnail. This isn't required, but it does make your blog much more vibrant.

While working on your blog post, you can see how it will appear to your visitors by clicking Preview.
Once you're satisfied with the result, click on Publish.

Step 5: Plugins & Other Essential Additions
Plugins are apps that you click into your WordPress site. They allow you to add functionality to your site without having to write a single line of code.
There are tens of thousands of free WordPress plugins available. Whatever functionality you want to add to your site, there's (probably) a plugin out there for it.
In this chapter, I'll discuss several must-have plugins. These plugins allow you to set up Google Analytics and help your blog rank higher in search engines (SEO).
Installing a WordPress Plugin
To install a WordPress plugin, click on Plugins » Add New in your WordPress dashboard menu.
Next, you can search for plugins by name or keyword using the Search Plugins field in the top right corner. Once you've downloaded a plugin, you can install it using the Upload button in the top left.

Once you've installed a plugin, you still need to activate it using the Activate button.
We are now going to install a few must-have plugins.
Install Google Analytics
Google Analytics provides insight into how many visitors your blog has, how many pages they view, how much time they spend on it, and much more.
It's smart to have Google Analytics set up on your blog from day one to track your visitor growth as precisely as possible.
First, go to Google Analytics and log in with your Gmail account. Once you're logged in, you can sign up for Google Analytics for free.

You'll now be asked for your details and blog URL. After that, you'll receive the Google Analytics tracking code.
Now go to your WordPress dashboard and install the MonsterInsights plugin.
After activating MonsterInsights, click on Insights » Settings to configure the plugin.

On the Settings page, click Connect MonsterInsights to install Google Analytics on your WordPress blog.
Follow the on-screen instructions to complete the installation. Once you've finished, you can access Google Analytics in the Reports section under Insights.

SEO: Optimize Your Blog for Search Engines
In many cases, your blog's success will depend on search engine traffic. SEO or search engine optimization helps users find your blog through Google and other search engines. That's why it's important to make your blog SEO-friendly from day one.
The Rank Math plugin significantly simplifies making your content SEO-friendly. For every blog post you publish, you receive easy-to-implement improvements that help you rank higher in Google.
More plugins and optimizations
Since there are tens of thousands of WordPress plugins available, choosing the right one can feel overwhelming.
Where exactly do you begin?
The exact plugins you'll need will depend on what functionality you want to add to your blog. However, the following plugins, in addition to those mentioned above, will be useful for any WordPress site:
- Loginizer. Countless WordPress websites are hacked every day. Loginizer protects you against brute-force attacks by blocking your attacker's IP address after a certain number of login attempts.
- W3 Total Cache. If you're not using a WordPress caching plugin, every element of your site gets re-requested with each visit. Even if your visitor has seen this content before. With a caching plugin, your site loads faster, provides a better user experience, puts less strain on your server, and improves your SEO. W3 Total Cache is the best free caching plugin available.
- UpdraftPlus. This is the most popular WordPress backup plugin on the market with over 2 million installations. You can automatically send backups of your site to Dropbox, Google Drive, and many other storage options. If your web hosting doesn't provide automatic backups, UpdraftPlus is a must-have.
Are you interested in plugins that provide more specialized functionality, such as making premium content available exclusively to paying members? Then check out our WordPress plugin guide.
Step 6: Monetize Your Blog
Unless you're starting a blog just to keep your friends and family updated on your travel adventures or similar activities, you probably want to make money from it.
Creating a successful blog can be quite profitable. However, it's not as simple as writing occasional posts and hitting the Publish button.
In this chapter, we'll explore what's involved in monetizing your blog.
Choose a niche
This is the most important decision you'll make for your blog.
What you write about determines the potential size of your audience, the number of visitors you'll attract (which is more challenging in competitive niches), and your enthusiasm for maintaining your blog.
Can't you just write about whatever interests you or comes to mind? You can. But in most cases, this approach won't lead to a successful blog.
Additionally, Google tends to favor specialized blogs, which helps improve your search engine optimization.
Find a blogging rhythm
Maintaining a blog is more like a marathon than a sprint. Most successful bloggers establish a sustainable, regular writing rhythm that they can keep up for years. Yes, you read that correctly: years.
Here are a few ground rules when it comes to publishing frequency:
- Try to publish an article at least once a week. You should aim for something substantial: a minimum of about 1500 words per piece.
- Serious (meaning full-time) bloggers publish 2-3 times per week
- Larger blogs publish new articles almost daily. This requires multiple writers.
Of course, there are exceptions to the rules mentioned above. Wait But Why is one of the world's largest and most beloved blogs. The publishing frequency of this blog is only once every few months on average. However, the quality of the articles on Wait But Why is so exceptionally high that the writer can get away with it. But the majority of bloggers won't find success with this strategy.
I know that writing isn't easy. That's why I recommend not filling your days with it. At some point, it will start to feel overwhelming. Initially, aim to publish just one article per week. You can then use the remaining time you have for your blog on things like web design and marketing.
Making Money
There are many ways to make money with your blog. Below, I'll explain the three most effective methods.
Affiliate marketing
One of the most popular ways to make money through a blog is by using affiliate marketing.
With affiliate marketing, you write about products that are relevant to your target audience. You include links to these products within your content. If a visitor purchases something through your affiliate link, you receive a commission from the seller.
For an e-commerce platform like Bol.com or Amazon, affiliate marketing is an excellent marketing channel. After all, they only pay a commission when an actual sale takes place.
For this reason, countless companies have affiliate programs. To find out if there are good affiliate programs within your niche, simply Google “[company name of product you want to write about] affiliate program.
Paid informational content
If you've developed unique expertise in a subject that resonates with many people, you can likely find individuals willing to pay for it. You'll need to plan this knowledge into a format that you can sell online, such as books, podcasts, ebooks, or online courses.
Necessity is often the mother of invention here: the entrepreneur has a need for information that doesn't yet exist.
This is exactly how Bony to Beastly came to be. 99% of the fitness industry focuses on people who want to lose weight. That's no help to you if you're too thin. So the founders of Bony to Beastly developed a course that helps slim men build muscle mass. This product became such a success that they developed a similar program for slim women.
The key to success with this model is to first publish plenty of valuable free content. Once you've managed to attract visitors to your site, you need to give them a compelling reason to sign up for your email list. From that point on, you can effectively promote your online courses through email marketing.
Advertisements
Advertisements have been part of the internet since its early days. Although website ads aren't as effective as they were a few decades ago, you still see them on an enormous number of websites.
For beginners, Google AdSense is the best network for placing ads on your blog.
Important note: Before this type of income becomes truly worthwhile, you'll need to attract tens of thousands of visitors each month. Also keep in mind that advertisements won't improve your site's user experience or loading speed.
Step 7: Design Your Blog Like a Pro
A good blog design leads to better engagement with your content, more loyal visitors, and more backlinks from other websites.
Yet design is something many bloggers spend little time on. The advantage of this is that if you do invest in design, you immediately stand out from the crowd.
Fortunately, by following a few simple design principles, you can make your blog posts look better than 90% of what's on the internet.
In this chapter, I'll explain what these principles are.
Readability
The readability of your text rests on several pillars. Here they are:
- Choose a font size of at least 16 pixels. Website fonts work differently than those in word processors. While font size 12 is perfectly fine in Word, it appears tiny on a website. That's why most sites use a font size of at least 16 pixels. For WebsiteGecko, we selected 18 pixels, and a platform like Medium even uses a font size of 21 pixels.
- Use generous line spacing. WebsiteGecko's font size of 18 pixels is paired with a line height of 1.9em. Use ample line spacing to ensure your text isn't cramped together. This makes reading much more comfortable.
- White space, white space, white space. White space is a critical component of good readability. I personally almost never write paragraphs longer than 4 lines. You see this with most bloggers. Nobody likes having to chisel their way through a long wall of text. Short paragraphs and plenty of white space make your articles much more digestible.
- Don't use too many different fonts. I recommend sticking to a maximum of two fonts. Not only is this easier to manage, but it also gives your blog a more professional appearance.
- Don't choose your font sizes randomly. As humans, we are drawn to beauty. And most beautiful things have perfect proportions. Believe it or not, this also applies to font sizes. Make sure your title, subtitle, and text sizes are modularly proportioned. You can easily do this using the Type-Scale tool.
Pro tip: If you're using Google Chrome, you can examine the fonts, line heights, and much more on any website using the following method. Select a piece of text, right-click on it, and then choose “Inspect.
This is what you'll see:

The perfect way to learn from websites you find attractive.
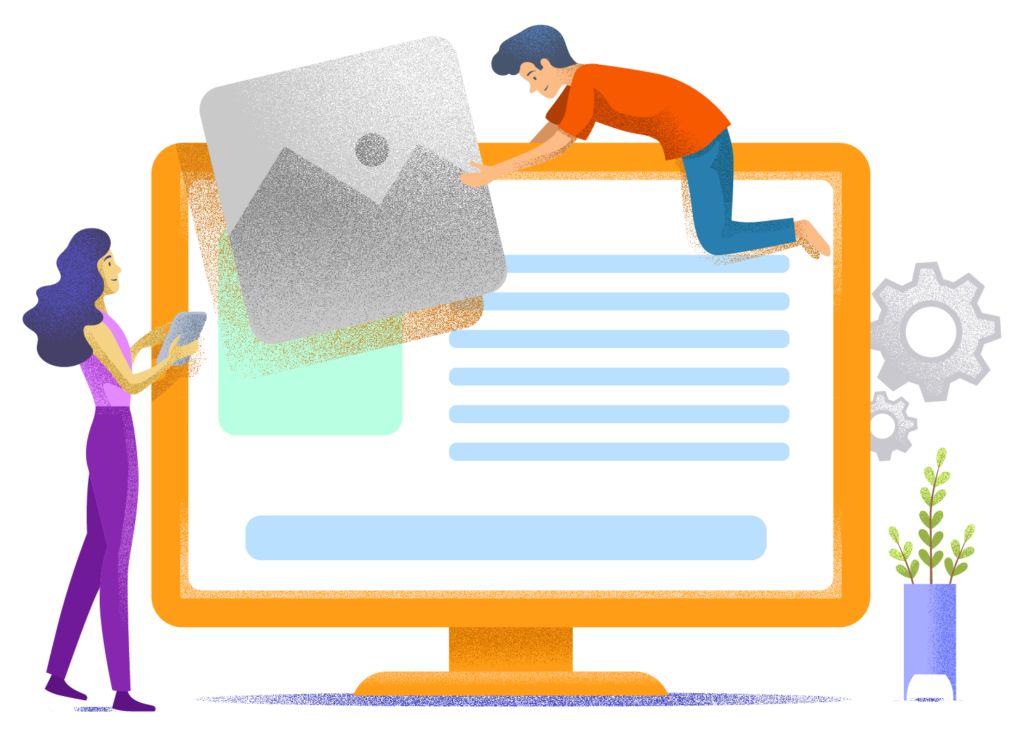
Images
People are visual creatures by nature. That's why it's essential to enhance your blog content with beautiful, relevant images. A website without images comes across as cold, unappealing, and boring.
Images not only make your content much more attractive, they also help readers follow step-by-step instructions. Consider, for example, the screenshots shown earlier in this article about the WordPress dashboard.
If you want to add images from the internet to your content, remember that these are usually copyrighted. Therefore, use a site like Pexels or Freepik for all your decorative images. As long as you provide proper attribution, you can use images from these sites for free.
Keep it simple
Beauty lies in simplicity. Whether it's clothing, everyday objects, or websites: simple design endures.
Don't add too many bells and whistles to your blog. Think Apple: keep it simple and clean.